从Nexus下载构件
Nexus 作为最流行的 Maven 私服之一,使用它主要目的之一:代理远程仓库,即当 Maven 需要下载构件到本地仓库使用时,不再请求外部的远程仓库,而直接从 Nexus 中下载。本节我们将介绍如何配置 Maven 从 Nexus 下载构件。
将 Nexus 的代理仓库配置到 Maven 项目中,用它们代替外部的远程仓库,即可实现 Maven 从 Nexus 下载构件。
- 在 pom.xml 中配置
- 在 setting.xml 中配置
在 pom.xml 中配置
在 Maven 项目的 pom.xml 中增加以下配置,可以为当前项目配置 Nexus 上的 bianchengbang_central_proxy 代理仓库。
<!--声明一个或多个远程仓库  -->
<repositories>
    <!-- 声明一个 Nexus 私服上的仓库  -->
    <repository>
        <!--仓库id  -->
        <id>nexus</id>
        <!-- 仓库的名称 -->
        <name>nexus</name>
        <!--仓库的地址  -->
        <url>http://localhost:8082/nexus/content/repositories/bianchengbang_central_proxy/</url>
        <!-- 是否开启该仓库的 release 版本下载支持 -->
        <releases>
            <enabled>true</enabled>
        </releases>
        <!-- 是否开启该仓库的 snapshot 版本下载支持 -->
        <snapshots>
            <enabled>true</enabled>
        </snapshots>
    </repository>
</repositories>
<!-- 声明一个或多个远程插件仓库 -->
<pluginRepositories>
    <!--声明一个 Nexus 私服上的插件仓库  -->
    <pluginRepository>
        <!--插件仓库 id -->
        <id>nexus</id>
        <!--插件仓库 名称 -->
        <name>nexus</name>
        <!-- 配置的插件仓库的地址 -->
        <url>http://localhost:8082/nexus/content/repositories/bianchengbang_central_proxy/</url>
        <!-- 是否开启该插件仓库的 release 版本下载支持 -->
        <releases>
            <enabled>true</enabled>
        </releases>
        <!-- 是否开启该插件仓库的 snapshot 版本下载支持 -->
        <snapshots>
            <enabled>true</enabled>
        </snapshots>
    </pluginRepository>
</pluginRepositories>
其中,在 repositories 元素下可以使用 repository 子元素声明一个或多个远程仓库,一个 repository 元素对应一个远程仓库。
repository 各个子元素含义如下表。
| 子元素 | 含义 |
|---|---|
| id | 仓库的唯一标识。需要注意的是,Maven 中央仓库的 id 为 central,如果其他的仓库也使用该 id,就会覆盖中央仓库的配置。 |
| name | 仓库的名称。 |
| url | 仓库的地址,该地址一般都是基于 HTTP 协议的,通过浏览器即可访问该地址,浏览仓库中的构件。 |
| releases/snapshots | 用来控制 Maven 对于发布和快照版本构件的下载。它们都有一个 enabled 子元素,enabled 的取值为 true,表示开启发布版或快照版的下载支持,否则表示关闭下载支持。 |
在 pluginRepositories 元素下可以使用 pluginRepository 子元素声明一个或多个远程插件仓库(包括私服上的仓库),一个 pluginRepository 元素对应一个远程插件仓库。pluginRepository 下所有子元素的含义均与与 repository 的子元素相同,这里就不再做过多赘述了。
示例 1
将以上配置加入 Maven 项目 Root 的 POM 文件中,并手动清空本地仓库的所有依赖构件(目的是为了让 Maven 重新获取构件)。打开命令行窗口,跳转到 Root 所在的目录下,执行以下 mvn 命令。
mvn clean install
执行结果如下。
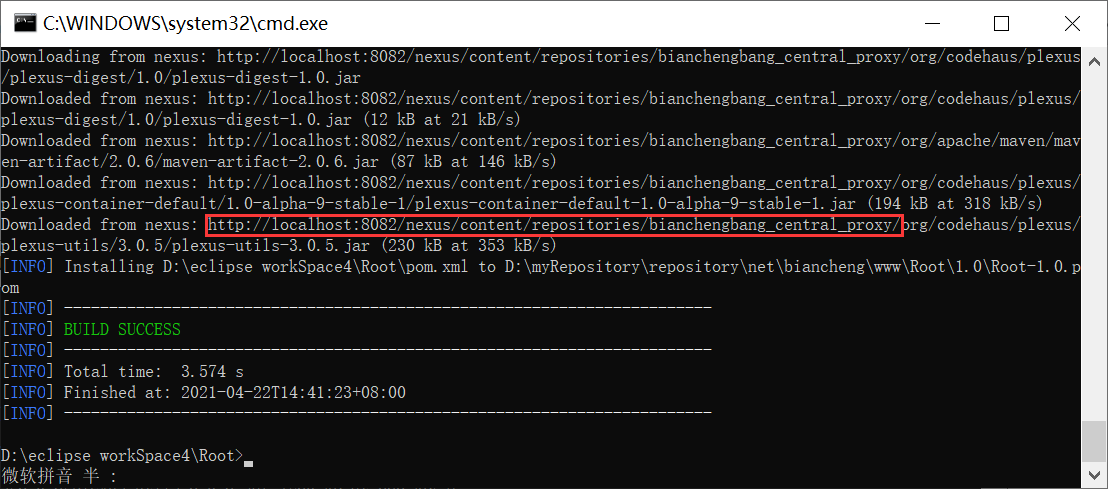
图1: 使用 Nexus 私服构建结果
由图 1 的构建过程可以看出,Root 项目构建所需的构建是从 Nexus 私服的 banchengbang_central_proxy 代理仓库中下载的,而不是从 Maven 中央仓库去下载。
在 setting 中配置
在 pom.xml 中配置 Nexus ,只对当前项目有效,在实际应用中,我们往往希望能够通过一次配置就能让本机中的所有 Maven 项目都使用 Nexus。此时,您可能会想到在 Maven 的 setting.xml 文件中进行配置,但 setting.xml 是不支持直接配置 repositories 和 pluginRepositories 。所幸 Maven 提供了 profile 机制,能够让我们将仓库配置放在 profile 中。
<profiles>
    <profile>
        <id>nexus</id>
        <!--声明一个或多个远程仓库  -->
        <repositories>
            <!-- 声明一个 Nexus 私服上的仓库  -->
            <repository>
                <!--仓库id  -->
                <id>nexus</id>
                <!-- 仓库的名称 -->
                <name>nexus</name>
                <!--仓库的地址  -->
                <url>http://localhost:8082/nexus/content/repositories/bianchengbang_central_proxy/</url>
                <!-- 是否开启该仓库的 release 版本下载支持 -->
                <releases>
                    <enabled>true</enabled>
                </releases>
                <!-- 是否开启该仓库的 snapshot 版本下载支持 -->
                <snapshots>
                    <enabled>true</enabled>
                </snapshots>
            </repository>
        </repositories>
        <!-- 声明一个或多个远程插件仓库 -->
        <pluginRepositories>
            <!--声明一个 Nexus 私服上的插件仓库  -->
            <pluginRepository>
                <!--插件仓库 id -->
                <id>nexus</id>
                <!--插件仓库 名称 -->
                <name>nexus</name>
                <!-- 配置的插件仓库的地址 -->
                <url>http://localhost:8082/nexus/content/repositories/bianchengbang_central_proxy/</url>
                <!-- 是否开启该插件仓库的 release 版本下载支持 -->
                <releases>
                    <enabled>true</enabled>
                </releases>
                <!-- 是否开启该插件仓库的 snapshot 版本下载支持 -->
                <snapshots>
                    <enabled>true</enabled>
                </snapshots>
            </pluginRepository>
        </pluginRepositories>
    </profile>
</profiles>

<activeProfiles>
    <activeProfile>nexus</activeProfile>
</activeProfiles>
以上配置中使用了一个 id 为 nexus 的 profile,这个 profile 中包含了与仓库相关的配置,同时配置中还使用了一个 activeProfiles 元素将 id 为 nexus 的 profile 激活。当本机有 Maven 项目构建时,profile 中的仓库配置就会应用到项目中。
示例 2
将以上配置分别添加到 Maven 安装目录\conf 和本地仓库目录下的 setting.xml 中,并将 Root 项目 POM 文件中的 repositories 和 pluginRepositories 等仓库设置删除。打开命令行窗口,跳转到 Root 项目下,执行以下 mvn 命令。
mvn clean install
执行结果如下。
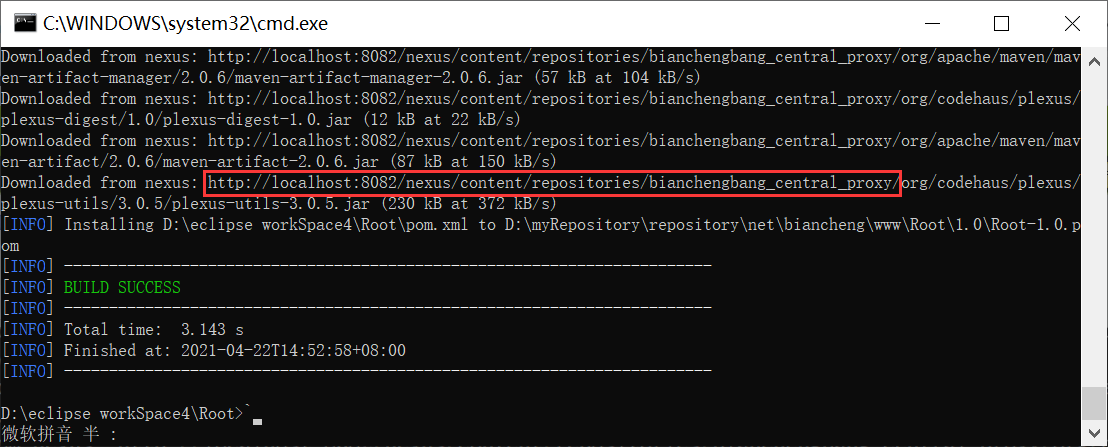
图2:Nexus 全局配置仓库
setting.xml 中添加镜像
Nexus 私服通常会与镜像(mirror)结合使用,使 Nexus 成为所有远程仓库的私服,这样不仅可以从 Nexus 中获取所有所需构件,还能将配置集中到 Nexus 私服中,简化 Maven 本身的配置。我们可以创建一个匹配任何仓库的镜像,镜像的地址为 Nexus 中仓库的地址,这样 Maven 对于任何构件的下载请求都会被拦截跳转到 Nexus 私服中,其具体配置如下。
<mirrors>
    <mirror>
        <id>nexus</id>
        <name>nexus name</name>
        <mirrorOf>*</mirrorOf>
        <url>http://localhost:8082/nexus/content/groups/bianchengbang_repository_group/</url>
    </mirror>
</mirrors>

<profiles>
    <profile>
        <id>nexus</id>
        <repositories>
            <repository>
                <id>central</id>
                <url>http://localhost:8082/nexus/content/repositories/bianchengbang_central_proxy/</url>
                <releases>
                    <enabled>true</enabled>
                </releases>
                <snapshots>
                    <enabled>true</enabled>
                </snapshots>
            </repository>
        </repositories>
        <pluginRepositories>
            <pluginRepository>
                <id>central</id>
                <url>http://localhost:8082/nexus/content/repositories/bianchengbang_central_proxy/</url>
                <releases>
                    <enabled>true</enabled>
                </releases>
                <snapshots>
                    <enabled>true</enabled>
                </snapshots>
            </pluginRepository>
        </pluginRepositories>
    </profile>
</profiles>

<activeProfiles>
    <activeProfile>nexus</activeProfile>
</activeProfiles>
仓库和插件仓库的配置中,它们的 id 取值都是 central,即它们的设置覆盖了 Maven 中央仓库,但此时这里的 URL 已经无法起到任何作用,因为镜像的匹配规则是 *,所有的请求都已经被拦截,跳转到 Nexus 私服的地址。
 ICP备案:
 公安联网备案: