部署构件到Nexus
如果仅仅是为了代理远程的公共仓库,那么 Nexus 的代理仓库就完全能够满足需要,但是我们知道,Nexus 除了代理仓库外,还有另一种仓库:宿主仓库。
宿主仓库的主要作用是存储公司或组织内部的构件,以及一些无法从公共仓库获取的第三方构件(JDBC 驱动),供用户下载使用。用户可以通过配置 Maven 将构件自动部署到 Nexus 宿主仓库,也可以在 Nexus 界面手动上传构件。
使用 Maven 将构件部署到 Nexus 宿主仓库中主要分为 3 步:
以上配置说明如下:
注意:以上配置中,server 元素中的 id 必须和 pom.xml 中 distributionManagement 元素对应仓库的 id 保持一致。Maven 在部署构件时,会先根据 id 查找用户名称和密码进行认证和登录,然后将构件部署到对应得宿主仓库。
1)打开命令行窗口,跳转到 test-upload-snapshot 项目得目录下,执行如下 Maven 命令。
2) Maven 命令执行结果如下图。
我们还是以 Maven 项目 App-Core-lib 为例,将其打包后手动上传到 Nexus 内置宿主仓库 3rd party 中,具体步骤如下。
1. 打开命令行窗口,跳转到 App-Core-lib 的目录下,执行如下 mvn 命令,对项目进行打包。
2.打包完成后,进入 App-Core-lib\target 目录,可以看到 Maven 已经将该项目打包成了一个 jar 文件,如图 2 所示。
3. 在 Nexus 界面的仓库列表中选择 3rd party 仓库,在下方选择 Artifact Upload 选项卡,其中 GAV Definition 用于定义上传构件的坐标信息。
GAV Definition 中提供了两种定义构件坐标的方式:
以上 2 种方式操作时会略有不同,下面我们分别对它们进行介绍。
定义好坐标后,点击 Select Artifact(s) to Upload... 按钮选择要上传的构件,然后点击 Add Artifact 按钮将其加入上传列表中。最后点击页面最下方的 Upload Artifact(s) 按钮,将构件上传到仓库中,如图 4 所示。
4. 在仓库列表中选中 3rd party 宿主仓库,在下方的 Browse Index 选项卡中,可以看到构件已经被部署到该仓库中,如图 5 所示。

宿主仓库的主要作用是存储公司或组织内部的构件,以及一些无法从公共仓库获取的第三方构件(JDBC 驱动),供用户下载使用。用户可以通过配置 Maven 将构件自动部署到 Nexus 宿主仓库,也可以在 Nexus 界面手动上传构件。
使用 Maven 部署构件到 Nexus
日常开发中,快照版本构件可以直接部署到 Nexus 中策略为 Snapshot 的宿主仓库中,而最终发布的版本则应该部署到 Nexus 中策略为 Release 的宿主仓库中。使用 Maven 将构件部署到 Nexus 宿主仓库中主要分为 3 步:
- 配置项目的 POM 文件。
- 在 setting.xml 中配置认证信息。
- 使用 mvn 命令部署构件。
下面我们通过一个实例来详细介绍如何使用 Maven 部署构件到 Nexus 宿主仓库。
1. 配置项目的 POM 文件
创建一个名为 test-upload-snapshot 的 Maven 项目,并在其 POM 文件中添加如下配置。
<project>
    ...
    <distributionManagement>
        <repository>
            <id>bianchengbang_Release_hosted</id>
            <url>http://localhost:8082/nexus/content/repositories/bianchengbang_Release_hosted/</url>
        </repository>
        <snapshotRepository>
            <id>bianchengbang_Snapshot_hosted</id>
            <url>http://localhost:8082/nexus/content/repositories/bianchengbang_Snapshot_hosted/</url>
        </snapshotRepository>
    </distributionManagement>
</project>
以上配置说明如下:
- distributionManagement 元素:负责将指定的构件部署到 Nexus 指定的仓库中。
- repository 元素:distributionManagement 的子元素,用于定义部署 Release 版本的构件被部署的仓库。它有 2 子元素:id 和 url ,其中 id 为 Nexus 仓库的唯一标识,url 为 Nexus 宿主仓库的 url。
- snapshotRepository 元素:distributionManagement 的子元素,用于定义部署 Snapshot 版本的构件被部署的仓库。它也有 2 子元素:id 和 url ,且与 repository 中含义一致。
在 setting.xml 中配置认证信息
最初版本的 Nexus 没有为宿主仓库提供任何的安全措施。如果宿主仓库开启了部署功能,任何人可以连接并部署构件至这个仓库,这显然是极不安全的。因此,现在的 Nexus 中增加了权限认证,Nexus 对于匿名用户是只读的,若想部署构件到 Nexus 中,则需要在 setting.xml 中配置如下认证信息。
<settings>
    ...
    <servers>
        <server>
            <id>bianchengbang_Release_hosted</id>
            <username>admin</username>
            <password>admin123</password>
        </server>
        <server>
            <id>bianchengbang_Snapshot_hosted</id>
            <username>admin</username>
            <password>admin123</password>
        </server>
    </servers>
</settings>
注意:以上配置中,server 元素中的 id 必须和 pom.xml 中 distributionManagement 元素对应仓库的 id 保持一致。Maven 在部署构件时,会先根据 id 查找用户名称和密码进行认证和登录,然后将构件部署到对应得宿主仓库。
3. 使用 mvn 命令部署构件
完成以上配置之后,就可以使用 Maven 命令将构件部署到宿主仓库了,操作步骤如下。1)打开命令行窗口,跳转到 test-upload-snapshot 项目得目录下,执行如下 Maven 命令。
mvn clean deploy
2) Maven 命令执行结果如下图。
[INFO] Scanning for projects...
[INFO]
[INFO] ---------------< net.biancheng.www:test-upload-snapshot >---------------
[INFO] Building test-upload-snapshot 0.0.1-SNAPSHOT
[INFO] --------------------------------[ jar ]---------------------------------
[INFO]
[INFO] --- maven-clean-plugin:2.5:clean (default-clean) @ test-upload-snapshot ---
[INFO] Deleting D:\eclipse workSpace 3\test-upload-snapshot\target
[INFO]
[INFO] --- maven-resources-plugin:2.6:resources (default-resources) @ test-upload-snapshot ---
[INFO] Using 'UTF-8' encoding to copy filtered resources.
[INFO] Copying 0 resource
[INFO]
[INFO] --- maven-compiler-plugin:3.1:compile (default-compile) @ test-upload-snapshot ---
[INFO] Nothing to compile - all classes are up to date
[INFO]
[INFO] --- maven-resources-plugin:2.6:testResources (default-testResources) @ test-upload-snapshot ---
[INFO] Using 'UTF-8' encoding to copy filtered resources.
[INFO] Copying 0 resource
[INFO]
[INFO] --- maven-compiler-plugin:3.1:testCompile (default-testCompile) @ test-upload-snapshot ---
[INFO] Nothing to compile - all classes are up to date
[INFO]
[INFO] --- maven-surefire-plugin:2.12.4:test (default-test) @ test-upload-snapshot ---
[INFO]
[INFO] --- maven-jar-plugin:2.4:jar (default-jar) @ test-upload-snapshot ---
[INFO] Building jar: D:\eclipse workSpace 3\test-upload-snapshot\target\test-upload-snapshot-0.0.1-SNAPSHOT.jar
[INFO]
[INFO] --- maven-install-plugin:2.4:install (default-install) @ test-upload-snapshot ---
[INFO] Installing D:\eclipse workSpace 3\test-upload-snapshot\target\test-upload-snapshot-0.0.1-SNAPSHOT.jar to D:\myRep
ository\repository\net\biancheng\www\test-upload-snapshot\0.0.1-SNAPSHOT\test-upload-snapshot-0.0.1-SNAPSHOT.jar
[INFO] Installing D:\eclipse workSpace 3\test-upload-snapshot\pom.xml to D:\myRepository\repository\net\biancheng\www\te
st-upload-snapshot\0.0.1-SNAPSHOT\test-upload-snapshot-0.0.1-SNAPSHOT.pom
[INFO]
[INFO] --- maven-deploy-plugin:2.7:deploy (default-deploy) @ test-upload-snapshot ---
Downloading from bianchengbang_Snapshot_hosted: http://localhost:8082/nexus/content/repositories/bianchengbang_Snapshot_
hosted/net/biancheng/www/test-upload-snapshot/0.0.1-SNAPSHOT/maven-metadata.xml
Downloaded from bianchengbang_Snapshot_hosted: http://localhost:8082/nexus/content/repositories/bianchengbang_Snapshot_h
osted/net/biancheng/www/test-upload-snapshot/0.0.1-SNAPSHOT/maven-metadata.xml (787 B at 9.2 kB/s)
Uploading to bianchengbang_Snapshot_hosted: http://localhost:8082/nexus/content/repositories/bianchengbang_Snapshot_host
ed/net/biancheng/www/test-upload-snapshot/0.0.1-SNAPSHOT/test-upload-snapshot-0.0.1-20210322.030343-5.jar
Uploaded to bianchengbang_Snapshot_hosted: http://localhost:8082/nexus/content/repositories/bianchengbang_Snapshot_hoste
d/net/biancheng/www/test-upload-snapshot/0.0.1-SNAPSHOT/test-upload-snapshot-0.0.1-20210322.030343-5.jar (2.1 kB at 28 k
B/s)
Uploading to bianchengbang_Snapshot_hosted: http://localhost:8082/nexus/content/repositories/bianchengbang_Snapshot_host
ed/net/biancheng/www/test-upload-snapshot/0.0.1-SNAPSHOT/test-upload-snapshot-0.0.1-20210322.030343-5.pom
Uploaded to bianchengbang_Snapshot_hosted: http://localhost:8082/nexus/content/repositories/bianchengbang_Snapshot_hoste
d/net/biancheng/www/test-upload-snapshot/0.0.1-SNAPSHOT/test-upload-snapshot-0.0.1-20210322.030343-5.pom (2.4 kB at 36 k
B/s)
Downloading from bianchengbang_Snapshot_hosted: http://localhost:8082/nexus/content/repositories/bianchengbang_Snapshot_
hosted/net/biancheng/www/test-upload-snapshot/maven-metadata.xml
Downloaded from bianchengbang_Snapshot_hosted: http://localhost:8082/nexus/content/repositories/bianchengbang_Snapshot_h
osted/net/biancheng/www/test-upload-snapshot/maven-metadata.xml (297 B at 11 kB/s)
Uploading to bianchengbang_Snapshot_hosted: http://localhost:8082/nexus/content/repositories/bianchengbang_Snapshot_host
ed/net/biancheng/www/test-upload-snapshot/0.0.1-SNAPSHOT/maven-metadata.xml
Uploaded to bianchengbang_Snapshot_hosted: http://localhost:8082/nexus/content/repositories/bianchengbang_Snapshot_hoste
d/net/biancheng/www/test-upload-snapshot/0.0.1-SNAPSHOT/maven-metadata.xml (787 B at 14 kB/s)
Uploading to bianchengbang_Snapshot_hosted: http://localhost:8082/nexus/content/repositories/bianchengbang_Snapshot_host
ed/net/biancheng/www/test-upload-snapshot/maven-metadata.xml
Uploaded to bianchengbang_Snapshot_hosted: http://localhost:8082/nexus/content/repositories/bianchengbang_Snapshot_hoste
d/net/biancheng/www/test-upload-snapshot/maven-metadata.xml (297 B at 5.2 kB/s)
[INFO] ------------------------------------------------------------------------
[INFO] BUILD SUCCESS
[INFO] ------------------------------------------------------------------------
[INFO] Total time:  2.342 s
[INFO] Finished at: 2021-03-22T11:03:44+08:00
[INFO] ------------------------------------------------------------------------
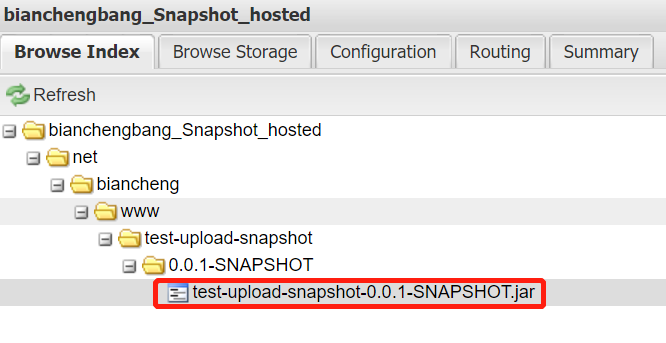
在 Nexus 界面的仓库列表选中 bianchengbang_Snapshot_hosted 宿主仓库,在下方的 Browse Index 选项卡中,可以看到 test-upload-snapshot 构件已经被部署到该仓库中,如图 1 所示。
图1:使用 Maven 部署构件到 Nexus
手动上传构件
有些 Jar 文件(如 Oracle 的 JDBC 驱动)由于许可证等原因,无法存放在公开仓库中。此外,还有一些小型的开源项目,它们没有将自己的构件分发到公共仓库中,也没有维护自己的仓库,因此这些构件是无法从公共仓库中获得的。若 Maven 项目中需要这类构件,我们就需要将构件下载到本地,然后手动上传到 Nexus 私服。我们还是以 Maven 项目 App-Core-lib 为例,将其打包后手动上传到 Nexus 内置宿主仓库 3rd party 中,具体步骤如下。
1. 打开命令行窗口,跳转到 App-Core-lib 的目录下,执行如下 mvn 命令,对项目进行打包。
mvn clean package
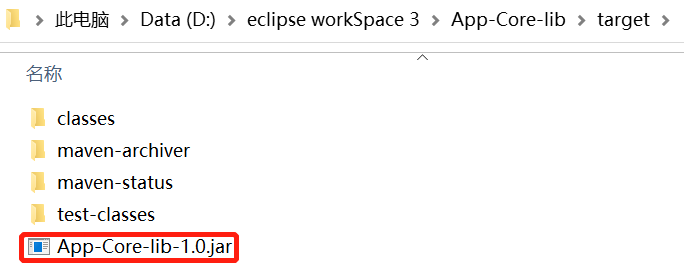
2.打包完成后,进入 App-Core-lib\target 目录,可以看到 Maven 已经将该项目打包成了一个 jar 文件,如图 2 所示。
图2:Maven 打包生成 jar 文件
3. 在 Nexus 界面的仓库列表中选择 3rd party 仓库,在下方选择 Artifact Upload 选项卡,其中 GAV Definition 用于定义上传构件的坐标信息。
GAV Definition 中提供了两种定义构件坐标的方式:
- 若该构件通过 Maven 构建产生的,则可以选择 From POM,Nexus 会自动从 POM 中获取构件的坐标。
- 若该构件来自第三方,则只能选择 GAV Parameters,手动定义构件的坐标。
以上 2 种方式操作时会略有不同,下面我们分别对它们进行介绍。
From POM
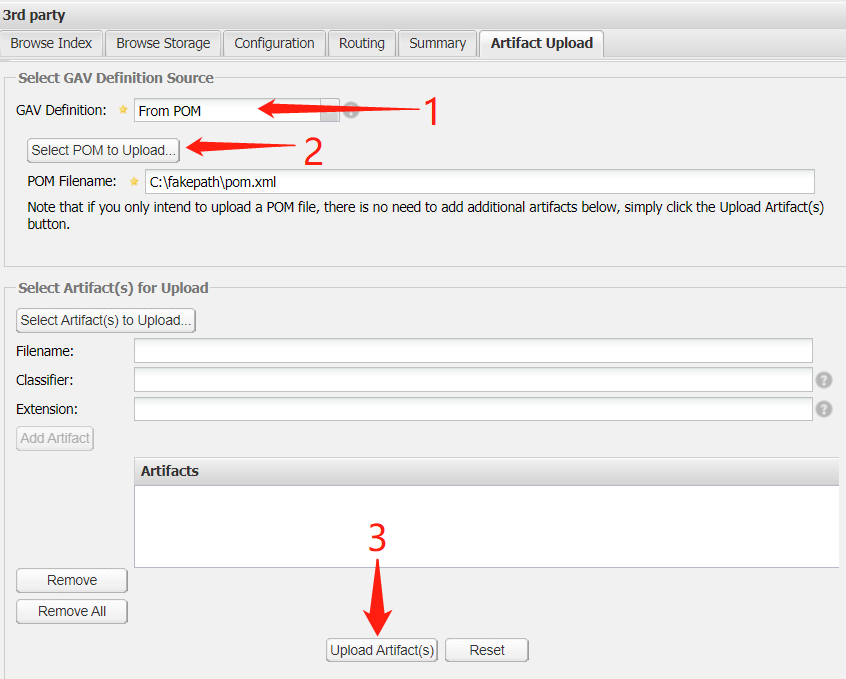
若该构件是通过 Maven 构建产生的,那么可以在 GAV Definition 下拉列表中,选择 From POM,然后指定该构件所属项目的 pom.xml,Nexus 会自动从 pom.xml 中获取构件的坐标。最后点击页面最下方的 Upload Artifact(s) 按钮,将构件上传到仓库中,如图 3 所示。
图3:Nexus 手动上传构件
GAV Paramters
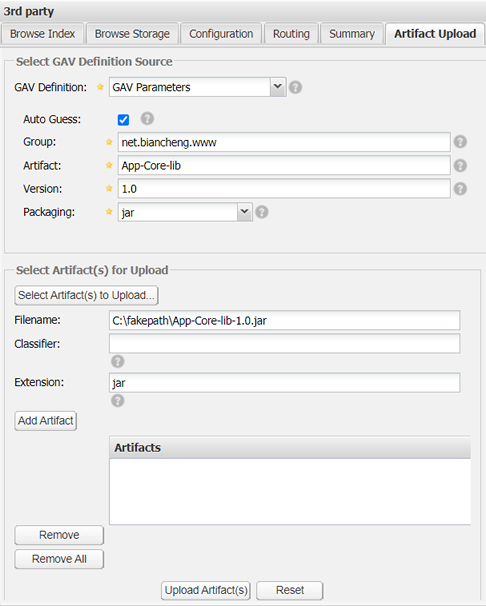
若构件不是通过 Maven 构建的,而是来自第三方(例如 Oracle 的 JDBC 驱动),则只能在 GAV Definition 下拉列表中,选择 GAV Parameters 手动定义构件的坐标。定义好坐标后,点击 Select Artifact(s) to Upload... 按钮选择要上传的构件,然后点击 Add Artifact 按钮将其加入上传列表中。最后点击页面最下方的 Upload Artifact(s) 按钮,将构件上传到仓库中,如图 4 所示。
图4:Nexus 第三方构件手动上传
4. 在仓库列表中选中 3rd party 宿主仓库,在下方的 Browse Index 选项卡中,可以看到构件已经被部署到该仓库中,如图 5 所示。
图5:第三方构件手动上传到Nexus
 ICP备案:
 公安联网备案: