Spring Boot整合Security的过程(新手必看)
在 Spring Boot 项目中集成 Spring Boot Security 非常简单,只需在项目中增加 Spring Boot Security 的依赖即可。
下面通过示例演示 Spring Boot 中基础 Security 的登录验证。

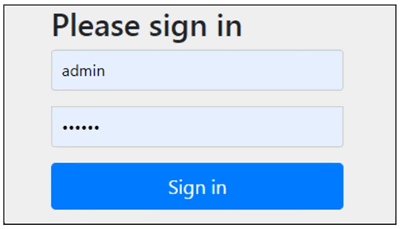
图 1 Spring Security登录验证
系统自动跳转到 Spring Security 默认的登录页面,输入之前配置的用户名和密码就可以登录系统,登录后的页面如下图所示:

图 2 Spring Security登录后的页面
通过上面的示例,我们看到 Spring Security 自动给所有访问请求做了登录保护,实现了页面权限控制。
下面通过示例演示 Spring Boot 中基础 Security 的登录验证。
添加依赖
Spring Boot 提供了集成 Spring Security 的组件包 spring-boot-starter-security,方便我们在 Spring Boot 项目中使用 Spring Security:
<dependency>
        <groupId>org.springframework.boot</groupId>
        <artifactId>spring-boot-starter-web</artifactId>
</dependency>
<dependency>
        <groupId>org.springframework.boot</groupId>
        <artifactId>spring-boot-starter-thymeleaf</artifactId>
</dependency>
<dependency>
        <groupId>org.springframework.boot</groupId>
        <artifactId>spring-boot-starter-security</artifactId>
</dependency>
上面除了引入 Security 组件外,因为我们要做 Web 系统的权限验证,所以还添加了 Web 和 Thymeleaf 组件。配置登录用户名和密码
用户名和密码在 application.properties 中进行配置:# security spring.security.user.name=admin spring.security.user.password=admin在 application.properties 配置文件中增加了管理员的用户名和密码。
添加Controller
创建 SecurityController 类,在类中添加访问页面的入口:
@Controller
public class SecurityController {
        @RequestMapping("/")
        public String index() {
                return "index";
        }
}
创建前端页面
在 resources/templates 目录下创建页面 index.html,这个页面就是具体的需要增加权限控制的页面,只有登录了才能进入此页。<!DOCTYPE html> <html xmlns="http://www.w3.org/1999/xhtml" xmlns:th="http://www.thymeleaf.org"> <body> <h1>Hello</h1> <p>我是登录后才可以看的页面</p> </body> </html>
测试验证
添加完重启项目,访问地址:http://localhost:8080/,页面会自动弹出一个登录框,如下图所示:
图 1 Spring Security登录验证
系统自动跳转到 Spring Security 默认的登录页面,输入之前配置的用户名和密码就可以登录系统,登录后的页面如下图所示:

图 2 Spring Security登录后的页面
通过上面的示例,我们看到 Spring Security 自动给所有访问请求做了登录保护,实现了页面权限控制。
 ICP备案:
 公安联网备案: