GAN生成对抗网络详解(Python实现)
生成对抗神经网络(generative adversative networks, GAN)其实是两个网络的组合,可以理解为一个网络生成模拟数据,另一个网络判别生成的数据是真实的还是模拟的。
生成模拟数据的网络要不断优化自己让判别的网络判断不出来,判别的网络也要优化自己让自己判断得更准确。

图 1 GAN结构图
其中:
判别器的目标是区分真假样本,生成器的目标是让判别器区分不出真假样本,两者目标相反,存在对抗。

图 2 GAN的基本框架
通过优化目标,使得我们可以调节概率生成模型的参数 θ,从而使得生成的概率分布和真实数据分布尽量接近。
首先,它引入了一个判别模型(常用的有支持向量机和多层神经网络)。其次,它的优化过程就是在寻找生成模型和判别模型之间的一个纳什均衡。
GAN 所建立的一个学习框架,实际上就是生成模型和判别模型之间的一个模仿游戏。生成模型的目的就是要尽量去模仿、建模和学习真实数据的分布规律;而判别模型则是要判别自己所得到的一个输入数据,究竟是来自于真实的数据分布还是来自于一个生成模型。通过这两个内部模型之间不断的竞争,从而提高两个模型的生成能力和判别能力。
【实例】对抗神经网络演示。
生成模拟数据的网络要不断优化自己让判别的网络判断不出来,判别的网络也要优化自己让自己判断得更准确。
GAN生成对抗神经网络结构
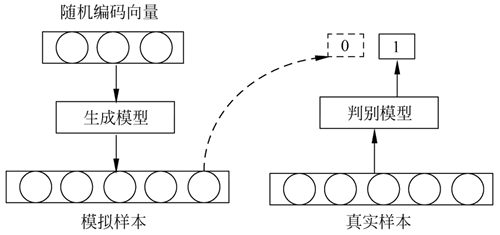
GAN 由生成模型和判别模型两部分构成。GAN 的结构如下图所示:
图 1 GAN结构图
其中:
- 生成模型又叫生成器(generator, G)。它先用一个随机编码向量来输出一个模拟样本(如图 1 左侧所示)。
- 判别模型又叫判别器(discriminator, D)。它的输入是一个样本(可以是真实样本也可以是模拟样本),输出一个判断该样本是真实样本还是模拟样本(假样本)的结果。
判别器的目标是区分真假样本,生成器的目标是让判别器区分不出真假样本,两者目标相反,存在对抗。
GAN生成对抗神经网络基本架构
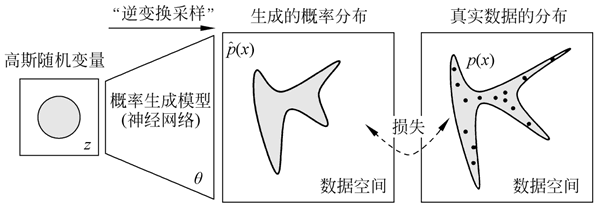
GAN 的基本框架如下图所示:
图 2 GAN的基本框架
通过优化目标,使得我们可以调节概率生成模型的参数 θ,从而使得生成的概率分布和真实数据分布尽量接近。
首先,它引入了一个判别模型(常用的有支持向量机和多层神经网络)。其次,它的优化过程就是在寻找生成模型和判别模型之间的一个纳什均衡。
GAN 所建立的一个学习框架,实际上就是生成模型和判别模型之间的一个模仿游戏。生成模型的目的就是要尽量去模仿、建模和学习真实数据的分布规律;而判别模型则是要判别自己所得到的一个输入数据,究竟是来自于真实的数据分布还是来自于一个生成模型。通过这两个内部模型之间不断的竞争,从而提高两个模型的生成能力和判别能力。
GAN生成对抗神经网络实战
前面已对 GAN 网络的定义、结构和基本架构进行了介绍,下面直接通过实例来演示 GAN 网络的实战。【实例】对抗神经网络演示。
import tensorflow as tf
import numpy as np
import pickle
import matplotlib.pyplot as plt
from tensorflow.examples.tutorials.mnist import input_data
mnist = input_data.read_data_sets('/data')
''' 网络架构
输入层:待生成图像(噪声)和真实数据
生成网络:将噪声图像进行生成
判别网络:
① 判断真实图像输出结果。
② 判断生成图像输出结果。

目标函数:
① 对于生成网络要使得生成结果通过判别网络为真。
② 对于判别网络要使得输入为真实图像时判别为真,输入为生成图像时判别为假。
'''
# 真实数据和噪声数据
def get_inputs(real_size, noise_size):
    real_img = tf.placeholder(tf.float32, [None, real_size])
    noise_img = tf.placeholder(tf.float32, [None, noise_size])
    return real_img, noise_img

'''生成器
noise_img:生成的噪声输入
n_units: 隐藏层单元个数
out_dim: 输出的大小(28×28×1)
'''
def get_generator(noise_img, n_units, out_dim, reuse=False, alpha=0.01):
    with tf.variable_scope("generator", reuse=reuse):
        # 隐藏层
        hidden1 = tf.layers.dense(noise_img, n_units)
        # ReLU 激活
        hidden1 = tf.maximum(alpha * hidden1, hidden1)
        # dropout
        hidden1 = tf.layers.dropout(hidden1, rate=0.2)

        # 分对数和输出
        logits = tf.layers.dense(hidden1, out_dim)
        outputs = tf.tanh(logits)
        return logits, outputs

'''判别器
# img: 输入
# n_units: 隐藏层单元数量
# reuse: 由于要使用两次
'''
def get_discriminator(img, n_units, reuse=False, alpha=0.01):
    with tf.variable_scope("discriminator", reuse=reuse):
        # 隐藏层
        hidden1 = tf.layers.dense(img, n_units)
        hidden1 = tf.maximum(alpha * hidden1, hidden1)
        # logits 与输出
        logits = tf.layers.dense(hidden1, 1)
        outputs = tf.sigmoid(logits)
        return logits, outputs

'''网络参数定义'''
img_size = mnist.train.images[0].shape[0]  # 输入大小
noise_size = 100  # 输入大小
g_units = 128  # 生成器隐藏层参数
d_units = 128  # 判别器隐藏层参数
learning_rate = 0.001  # 学习率
alpha = 0.01  # 学习率

# 构建网络
tf.reset_default_graph()
real_img, noise_img = get_inputs(img_size, noise_size)
# 生成器
g_logits, g_outputs = get_generator(noise_img, g_units, img_size)
# 判别器
d_logits_real, d_outputs_real = get_discriminator(real_img, d_units)
d_logits_fake, d_outputs_fake = get_discriminator(g_outputs, d_units, reuse=True)

# 目标函数
# 识别真实的图片
d_loss_real = tf.reduce_mean(tf.nn.sigmoid_cross_entropy_with_logits(logits=d_logits_real, labels=tf.ones_like(d_logits_real)))
# 识别生成的图片
d_loss_fake = tf.reduce_mean(tf.nn.sigmoid_cross_entropy_with_logits(logits=d_logits_fake, labels=tf.zeros_like(d_logits_fake)))
# 总体损失
d_loss = tf.add(d_loss_real, d_loss_fake)
# 优化器
train_vars = tf.trainable_variables()
# 生成器
g_vars = [var for var in train_vars if var.name.startswith("generator")]
# 判别器
d_vars = [var for var in train_vars if var.name.startswith("discriminator")]
# 优化
d_train_opt = tf.train.AdamOptimizer(learning_rate).minimize(d_loss, var_list = d_vars)
g_train_opt = tf.train.AdamOptimizer(learning_rate).minimize(g_loss, var_list = g_vars)

# 训练
batch_size = 64  # batch大小
epochs = 300  # 训练迭代轮数
n_sample = 25  # 抽取样本数
samples = []  # 存储测试样例
losses = []
saver = tf.train.Saver(var_list = g_vars)  # 保存生成器变量

# 开始训练
with tf.Session() as sess:
    sess.run(tf.global_variables_initializer())
    for e in range(epochs):
        for batch_i in range(mnist.train.num_examples//batch_size):
            batch = mnist.train.next_batch(batch_size)
            batch_images = batch[0].reshape((batch_size, 784))
            # 对图像像素进行 scale,这是因为 tanh 输出的结果介于 (-1,1),real 和 fake 图片共享 discriminator 的参数
            batch_images = batch_images * 2 - 1
            # generator 的输入噪声
            batch_noise = np.random.uniform(-1, 1, size = (batch_size, noise_size))
            # 运行优化
            _ = sess.run(g_train_opt, feed_dict = {real_img: batch_images, noise_img: batch_noise})
            _ = sess.run(d_train_opt, feed_dict = {real_img: batch_images, noise_img: batch_noise})
        # 每一轮结束计算 loss
        train_loss_d = sess.run(d_loss,
                               feed_dict = {real_img: batch_images,
                                            noise_img: batch_noise})

        # 真实图像 loss
        train_loss_d_real = sess.run(d_loss_real,
                                    feed_dict = {real_img: batch_images,
                                                 noise_img: batch_noise})

        # 生成的图像 loss
        train_loss_d_fake = sess.run(d_loss_fake,
                                    feed_dict = {real_img: batch_images,
                                                 noise_img: batch_noise})

        # 生成器 loss
        train_loss_g = sess.run(g_loss,
                               feed_dict = {noise_img: batch_noise})
        print("Epoch {}/{}...".format(e + 1, epochs),
              "Discriminator Loss: {:.4f}".format(train_loss_d),
              "Generator Loss: {:.4f}".format(train_loss_g))

        losses.append((train_loss_d, train_loss_d_real, train_loss_d_fake, train_loss_g))
        # 保存样本
        sample_noise = np.random.uniform(-1, 1, size = (n_sample, noise_size))
        gen_samples = sess.run(get_generator(noise_img, g_units, img_size, reuse=True),
                               feed_dict = {noise_img: sample_noise})
        samples.append(gen_samples)
        saver.save(sess, './checkpoints/generator.ckpt')

# loss 迭代曲线
fig, ax = plt.subplots(figsize = (20, 7))
losses = np.array(losses)
plt.plot(losses.T[0], label = '判别器总损失')
plt.plot(losses.T[1], label = '判别器真实损失')
plt.plot(losses.T[2], label = '判别器生成损失')
plt.plot(losses.T[3], label = '生成器损失')
plt.title("对抗生成网络")
plt.legend()
plt.show()

# 生成结果
# 在训练时从生成器中加载样本
with open('train_samples.pkl', 'rb') as f:
    samples = pickle.load(f)
# samples 是保存的结果 epoch 是第多少次迭代
def view_samples(epoch, samples):
    fig, axes = plt.subplots(figsize = (7, 7), nrows = 5, ncols = 5, sharex = True, sharey = True)
    for ax, img in zip(axes.flatten(), samples[epoch][1]):  # 这里 samples[epoch][1]代表生成的图像结果,而[0]代表对应的 logits
        ax.axis.set_visible(False)
        ax.yaxis.set_visible(False)
        im = ax.imshow(img.reshape(28,28), cmap = 'Greys_r')
    return fig, axes
_ = view_samples(- 1, samples)  # 显示最终的生成结果

# 显示整个生成过程图片,指定要查看的轮次
epoch_idx = [10, 30, 60, 90, 120, 150, 180, 210, 240, 290]
show_imgs = []
for i in epoch_idx:
    show_imgs.append(samples[i][1])

# 指定图片形状
rows, cols = 10, 25
fig, axes = plt.subplots(figsize = (30, 12), nrows = rows, ncols = cols, sharex = True, sharey = True)
idx = range(0, epochs, int(epochs/rows))
for sample, ax_row in zip(show_imgs, axes):
    for img, ax in zip(sample[:int(len(sample)/cols)], ax_row):
        ax.imshow(img.reshape(28,28), cmap = 'Greys_r')
        ax.xaxis.set_visible(False)
        ax.yaxis.set_visible(False)
# 生成新的图片
saver = tf.train.Saver(var_list = g_vars)
with tf.Session() as sess:
    saver.restore(sess, tf.train.latest_checkpoint('checkpoints'))
    sample_noise = np.random.uniform(-1, 1, size = (25, noise_size))
    gen_samples = sess.run(get_generator(noise_img, g_units, img_size, reuse=True),
                            feed_dict = {noise_img: sample_noise})
_ = view_samples(0, [gen_samples])
运行程序,迭代过程如下:
Epoch 1/300...判别器损失:0.0540(判别真实的:0.0004 + 判别生成的:0.0535)...生成器损失:
4.7416
Epoch 2/300...判别器损失:0.0520(判别真实的:0.0117 + 判别生成的:0.0403)...生成器损失:
5.6192
…
Epoch 299/300...判别器损失:0.9331(判别真实的:0.4824 + 判别生成的:0.4507)...生成器损失:
1.4638
Epoch 300/300...判别器损失:0.8089(判别真实的:0.3881 + 判别生成的:0.4209)...生成器损失:
1.7238
 ICP备案:
 公安联网备案: