Python安装模块的三种方法(新手必看)
Python 安装某个特定的模块,本节给大家讲解 3 种方法,实际操作时大家结合自身情况任选一种即可。
 我这里是因为已经安装了,所以会出现这个。安装模块:
如果觉得安装太慢,可以用下面的方法:
同样也可以指定版本:

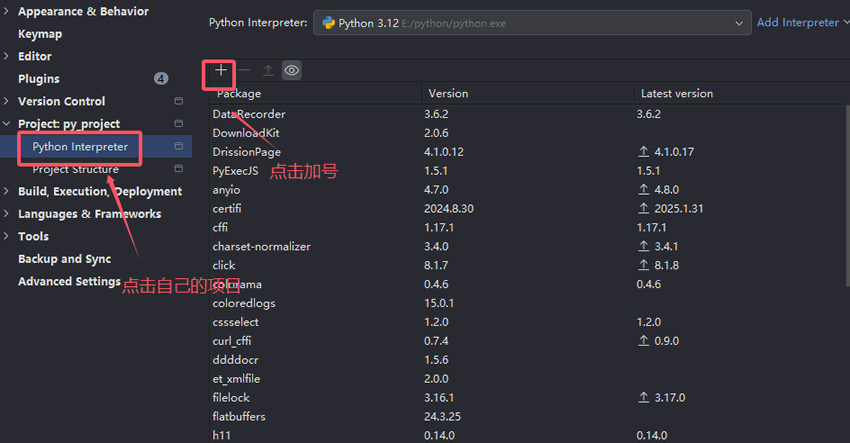
选择自己的项目名称,然后点击加号:

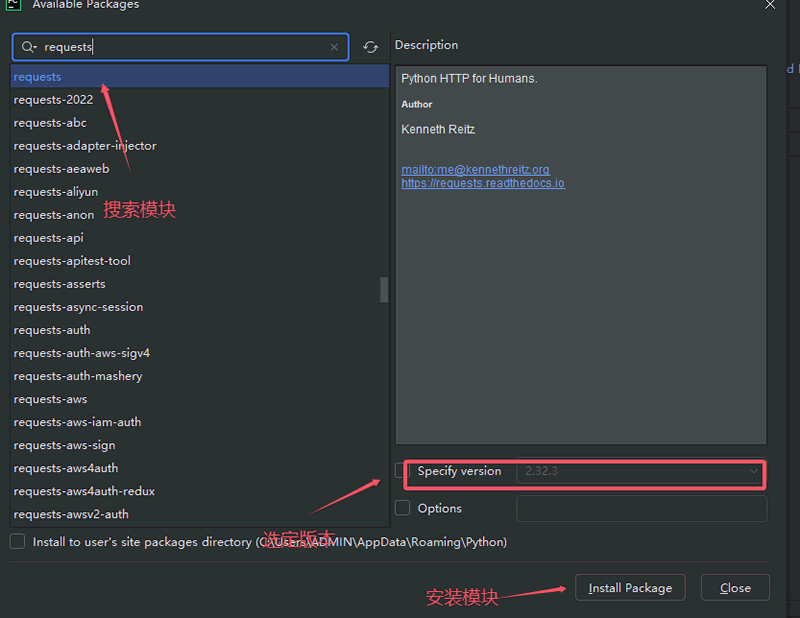
搜索要按照的库,然后还可以选择库的版本,最后点击安装即可:

1、在PyCharm中安装模块

pip install 模块名
可以指定安装版本 如安装 requests 版本是 2.25.1:pip install requests == 2.25.1
如果觉得安装太慢,可以用下面的方法:
pip install -i 镜像源网址 模块名
这里大家可以使用下面三个常见的镜像源网址:- 阿里云镜像源:http://mirrors.aliyun.com/pypi/simple/
- 清华镜像源:https://mirrors.tuna.tsinghua.edu.cn/help/pypi/
- 豆瓣镜像源:https://pypi.doubanio.com/simple
同样也可以指定版本:
pip install -i https://mirrors.tuna.tsinghua.edu.cn/help/pypi/ requests == 2.25.1
查看可以升级的包:pip list --outdate
升级包:pip install --upgrade 包名
卸载模块:pip uninstall 模块名
我们也可以查看自己安装了多少模块:pip list
2、Python安装模块方法二
win+R弹出运行命令的快捷按键,输入cmd,然后回车,在弹出的窗口输入,用这种方法的前提是已经配置了环境变量。
# 第一种方法都能在这里使用
# pip install 模块名
# 阿里云镜像源 http://mirrors.aliyun.com/pypi/simple/
# 清华镜像源 https://mirrors.tuna.tsinghua.edu.cn/help/pypi/
# 豆瓣镜像源 https://pypi.doubanio.com/simple
# pip install -i 镜像源网址 模块名
# 卸载模块
# pip uninstall 模块名
# 我们也可以查看自己安装了多少模块
# pip list

3、新版PyCharm中安装模块
在新版 pycharm 中,点击左上角的菜单,找到设置并点击:
选择自己的项目名称,然后点击加号:

搜索要按照的库,然后还可以选择库的版本,最后点击安装即可:

 ICP备案:
 公安联网备案: