Spring Boot starter的用法(非常详细)
现在使用 Spring 流行零 XML 配置,也就是通过配置类和注解完成 Spring 配置。
在搭建每个 Spring 项目过程中,需要反复完成如下操作:
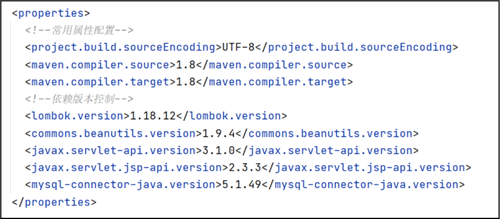
1) 配置属性,如下图所示,例如 JDK 版本、类库的版本等。

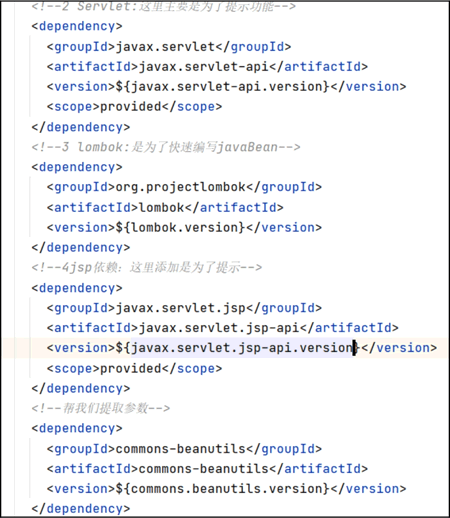
2) 添加多个依赖到 pom.xml,如下图所示,耗费大量精力解决依赖以及版本搭配问题。

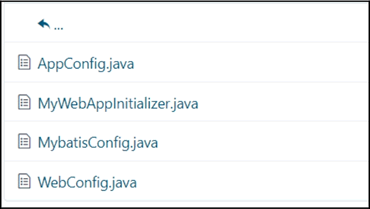
3) 编写多个配置类,如下图所示:

4) 把易变信息(例如数据库用户名和密码)写在属性文件中,如下图所示:

针对这个情况,Spring Boot 使用 stater 来减少重复工作。一般 starter 由两个模块组成:
易变信息写在 Spring Boot 默认配置文件 application.properites/application.yml 中。
这样就可以做到开箱即用,不用再做很多重复工作,仅仅需要修改一些配置即可。
常用的 starter 如下表所示:
② 创建 kaptcha-spring-boot-starter 模块。
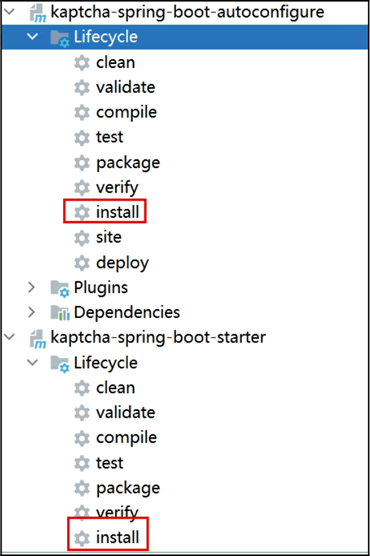
③ 将自动配置模块及 starter 模块安装到本地仓库。

单击后安装到本地库,以便其他项目可以引用。

在搭建每个 Spring 项目过程中,需要反复完成如下操作:
1) 配置属性,如下图所示,例如 JDK 版本、类库的版本等。

2) 添加多个依赖到 pom.xml,如下图所示,耗费大量精力解决依赖以及版本搭配问题。

3) 编写多个配置类,如下图所示:

4) 把易变信息(例如数据库用户名和密码)写在属性文件中,如下图所示:

针对这个情况,Spring Boot 使用 stater 来减少重复工作。一般 starter 由两个模块组成:
- stater 模块:完成版本控制、属性和依赖导入。
- 自动配置模块:提供自动配置类以及自动配置类在 META-INF/spring.factories 中的配置。
易变信息写在 Spring Boot 默认配置文件 application.properites/application.yml 中。
这样就可以做到开箱即用,不用再做很多重复工作,仅仅需要修改一些配置即可。
官方starter
Spring Boot 预先定义好了很多 starter,需要使用某个功能时,导入对应 starter 即可。常用的 starter 如下表所示:
| 名称 | 作用 |
|---|---|
| spring-boot-starter-web | 构建 Web,包括 RESTful、Spring MVC 应用。默认使用 Tomcat 作为嵌入容器 |
| spring-boot-starter-thymeleaf | 支持 Thymeleaf 视图的 MVC Web 应用 |
| spring-boot-starter-parent | 它的父项目是 spring-boot-dependencies,用于项目属性配置和版本管理,Spring Boot 项目一般都使用它作为父项目 |
| spring-boot-starter-test | 对 Spring Boot 项目进行测试 |
| spring-boot-starter-data-neo4j | 提供 Neo4j 支持 |
| spring-boot-starter-data-redis | 提供 Redis 支持 |
自定义starter
在 Web 应用中会使用验证码,一般使用 kaptcha 类库,需要很多配置。下面制作一个 Spring Boot 的 starter,简化 kaptcha 使用。1) 步骤
① 创建 kaptcha-spring-boot-autoconfigure 模块:- 定义代码生成器核心对象的配置类信息;
- 在 META-INF/spring.factories 中扩展自动配置。
② 创建 kaptcha-spring-boot-starter 模块。
③ 将自动配置模块及 starter 模块安装到本地仓库。
2) 新建一个空项目
在合适的目录下新建一个 custom-kaptcha-autoconfigure 目录,然后在 IDEA 中选择 File→open...,选中新建的目录。3) 新建module
创建 kaptcha-spring-boot-autoconfigure 模块,选中 Maven 项目,修改 pom.xml,代码如下:
<groupId>com.guodexian</groupId>
<artifactId>kaptcha-spring-boot-autoconfigure</artifactId>
<version>1.0-SNAPSHOT</version>

<parent>
    <groupId>org.springframework.boot</groupId>
    <artifactId>spring-boot-starter-parent</artifactId>
    <version>2.2.11.RELEASE</version>
</parent>

<properties>
    <maven.compiler.source>8</maven.compiler.source>
    <maven.compiler.target>8</maven.compiler.target>
</properties>

<dependencies>
    <dependency>
        <groupId>org.springframework.boot</groupId>
        <artifactId>spring-boot-starter-web</artifactId>
    </dependency>

    <!-- 导入自动配置的相关依赖坐标 -->
    <dependency>
        <groupId>org.springframework.boot</groupId>
        <artifactId>spring-boot-autoconfigure</artifactId>
    </dependency>

    <!-- 方便 IDE 能够检测到该依赖中用到的配置属性,能够自动补全,其实就是在编译的时候在 META-INF 下面生成了一个 spring-configuration-metadata.json 文件 -->
    <dependency>
        <groupId>org.springframework.boot</groupId>
        <artifactId>spring-boot-configuration-processor</artifactId>
        <optional>true</optional>
    </dependency>

    <!-- 验证码依赖 -->
    <dependency>
        <groupId>com.github.penggle</groupId>
        <artifactId>kaptcha</artifactId>
        <version>2.3.2</version>
    </dependency>

    <dependency>
        <groupId>org.projectlombok</groupId>
        <artifactId>lombok</artifactId>
    </dependency>
</dependencies>
4) 新建属性类
属性类接收配置文件中配置的属性,可以给属性提供默认值,如下代码所示:
@Data
@Component
@ConfigurationProperties(prefix = "kaptcha")
public class KaptchaProperties {
    private int imageWidth = 100;
    private int imageHeight = 40;
    private int textProducerFontSize = 32;
    private String textProducerFontColor = "0,0,0";
    private String textProducerCharString = "0123456789ABCDEFGHIJKLMNOPQRSTUVWXYZ";
    private int textProducerCharLength = 4;
    private String noiseImpl = "com.google.code.kaptcha.impl.NoNoise";
}
5) 新建配置类
完成自动配置类,只有 Kaptcha 类库添加后才需要配置,因而使用注解 @ConditionalOnClass,如下代码所示:@Configuration @ConditionalOnClass(KaptchaServlet.class) @Import(KaptchaProperties.class) // 导入属性文件接收类 public class KaptchaConfiguration { @Autowired private KaptchaProperties kaptchaProperties; @Bean public Producer producer() { Properties properties = new Properties(); properties.setProperty("kaptcha.image.width", kaptchaProperties.getImageWidth() + ""); properties.setProperty("kaptcha.image.height", kaptchaProperties.getImageHeight() + ""); properties.setProperty("kaptcha.textproducer.font.size", kaptchaProperties.getTextProducerFontSize() + ""); properties.setProperty("kaptcha.textproducer.font.color", kaptchaProperties.getTextProducerFontColor()); properties.setProperty("kaptcha.textproducer.char.string", kaptchaProperties.getTextProducerCharString()); properties.setProperty("kaptcha.textproducer.char.length", kaptchaProperties.getTextProducerCharLength() + ""); properties.setProperty("kaptcha.noise.impl", kaptchaProperties.getNoiseImpl()); DefaultKaptcha kaptchaProducer = new DefaultKaptcha(); Config config = new Config(properties); kaptchaProducer.setConfig(config); return kaptchaProducer; } }
6) 新建spring.factories
在 resources 目录新建 META-INF 目录,然后新建 spring.factories,内容如下所示:# 注册自定义自动配置 org.springframework.boot.autoconfigure.EnableAutoConfiguration=com.guodexi an.kaptcha.config.KaptchaConfiguration
7) 新建模块kaptcha-spring-boot-starter
新建一个 Maven 模块后删除 src,对应 starter 项目不需要有内容,修改 pom.xml:
<groupId>com.guodexian</groupId>
<artifactId>kaptcha-spring-boot-starter</artifactId>
<version>1.0-SNAPSHOT</version>

<properties>
    <maven.compiler.source>8</maven.compiler.source>
    <maven.compiler.target>8</maven.compiler.target>
</properties>

<dependencies>
    <dependency>
        <groupId>com.guodexian</groupId>
        <artifactId>kaptcha-spring-boot-autoconfigure</artifactId>
        <version>1.0-SNAPSHOT</version>
    </dependency>
    <dependency>
        <groupId>com.github.penggle</groupId>
        <artifactId>kaptcha</artifactId>
        <version>2.3.2</version>
    </dependency>
</dependencies>
8) 安装两个模块到本地库

单击后安装到本地库,以便其他项目可以引用。
9) 新建测试Maven项目
新建一个基于 Spring Boot 名称为 test-kaptcha-auto-configuration 的项目,修改 pom.xml 导入自定义的 stater:
<dependency>
    <groupId>com.guodexian</groupId>
    <artifactId>kaptcha-spring-boot-starter</artifactId>
    <version>1.0-SNAPSHOT</version>
</dependency>
10) 新建启动类
定义一个 Controller 方法,返回验证码,代码如下所示:@SpringBootApplication @Controller public class Application { @Autowired private Producer producer; public static void main(String[] args) { SpringApplication.run(Application.class, args); } @GetMapping(path = "/kaptcha") public void getKaptcha(HttpServletResponse response, HttpSession session) { // 生成验证码 String text = producer.createText(); BufferedImage image = producer.createImage(text); // 将验证码存入 session session.setAttribute("kaptcha", text); // 将图片输出给浏览器 response.setContentType("image/png"); try (OutputStream os = response.getOutputStream()) { ImageIO.write(image, "png", os); } catch (IOException e) { System.out.println("响应验证码失败:" + e.getMessage()); } } }
11) 配置application.yml
如果不满足需求,就修改某些默认值,如下代码所示:kaptcha: textproducer-char-length: 5
12) 测试
启动测试项目,通过浏览器访问,如果成功,就会看到如下图所示的结果:
 ICP备案:
 公安联网备案: