MySQL安装配置教程(图文并茂,新手必看)
MySQL 是一个关系数据库管理系统(Relational Database Management System, RDBMS),是非常流行的关系数据库管理系统之一。
本节带领读者熟悉 Ubuntu 安装和配置 MySQL 的整个过程。
MySQL 的安装配置过程如下:
1) 在 Ubuntu 中,默认情况下只有最新版本的 MySQL 被包含在 APT 软件包存储库中。要安装 MySQL,只需更新服务器上的包索引并安装默认包 apt-get,具体如下:

图 1 更新服务器上的包索引并安装默认包apt-get

图 2 输入Y继续安装MySQL

图 3 安装过程中弹出的界面
2) 初始化配置,具体如下:
3) 使用 systemctl status mysql.service 命令检查 MySQL 服务状态,如下图所示:

图 4 MySQL服务状态
可以看出,Active 为 active (running),这说明 MySQL 服务状态是正常的。
4) MySQL 客户端连接服务器。使用客户端工具 MySQL 进入 MySQL 命令提示符下,连接 MySQL。
下面是一个从命令行中连接 MySQL 服务器的简单实例:
本节带领读者熟悉 Ubuntu 安装和配置 MySQL 的整个过程。
MySQL 的安装配置过程如下:
1) 在 Ubuntu 中,默认情况下只有最新版本的 MySQL 被包含在 APT 软件包存储库中。要安装 MySQL,只需更新服务器上的包索引并安装默认包 apt-get,具体如下:
# 命令1
sudo apt-get update
# 命令2
sudo apt-get install mysql-server
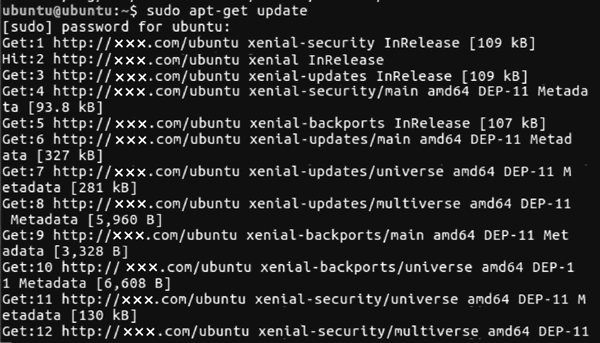
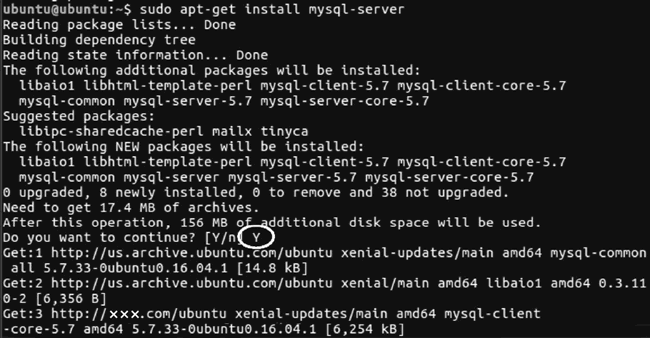
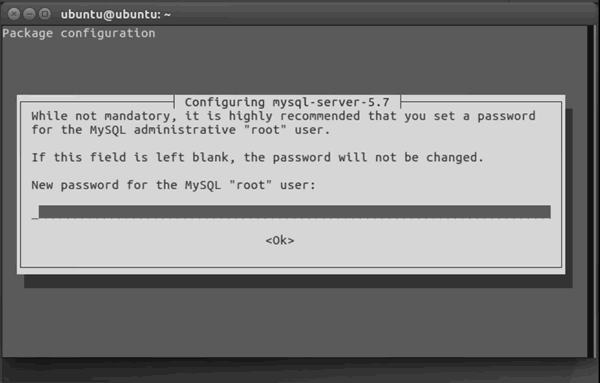
在安装 MySQL 服务时,系统会提示是否继续,这时输入 Y 即可继续安装。本步骤所涉及的内容如图 1~图 3 所示。

图 1 更新服务器上的包索引并安装默认包apt-get

图 2 输入Y继续安装MySQL

图 3 安装过程中弹出的界面
2) 初始化配置,具体如下:
ubuntu@ubuntu:~$ sudo mysql_secure_installation
[sudo] password for ubuntu:
Securing the MySQL server deployment.
Connecting to MySQL using a blank password.
# 修改密码
VALIDATE PASSWORD PLUGIN can be used to test passwords
and improve security. It checks the strength of password
and allows the users to set only those passwords which are
secure enough. Would you like to setup VALIDATE PASSWORD plugin?
# 是否启用密码安全级别校验
Press y|Y for Yes, any other key for No: y # 启用密码安全级别校验
There are three levels of password validation policy:
# 0 长度 >= 8, 低级别; 1 长度 >= 8, 数字 + 混合大小写 + 特殊字符; 2 长度 >= 8, 强长度,
# 数字 + 混合大小写 + 特殊字符和字典
LOW    Length >= 8
MEDIUM Length >= 8, numeric, mixed case, and special characters
STRONG Length >= 8, numeric, mixed case, special characters and dictionary file
Please enter 0 = LOW, 1 = MEDIUM and 2 = STRONG: 0 # 测试可以选择低级别
Please set the password for root here.
# 输入新密码
New password:
Re-enter new password:
Estimated strength of the password: 25
# 是否继续使用所提供的密码
Do you wish to continue with the password provided?(Press y|Y for Yes, any other
key for No) : Y # 是
By default, a MySQL installation has an anonymous user, allowing anyone to log
into MySQL without having to have a user account created for them. This is in
tended only for testing, and to make the installation go a bit smoother.
# You should remove them before moving into a production environment.
# 是否删除匿名账户,MySQL数据库默认在user表中,有一条记录,其host字段为localhost,user
# 字段为空,password字段为空。该记录表明MySQL数据库中具有一个匿名账户,可以通过本地localhost
# 域名连接数据库。根据项目需求进行相应设置即可
Remove anonymous users? (Press y|Y for Yes, any other key for No) : N # 否
  ... skipping.
Normally, root should only be allowed to connect from
'localhost'. This ensures that someone cannot guess at
the root password from the network.
Disallow root login remotely? (Press y|Y for Yes, any other key for No) : Y
Success.
# 默认情况下,MySQL附带一个名为“test”的数据库,任何人都可以访问。这仅用于测试,在进入生产前
# 应将其移除
By default, MySQL comes with a database named 'test' that anyone can access. This
is also intended only for testing, and should be removed before moving into a
production environment.
# 是否删除test
Remove test database and access to it? (Press y|Y for Yes, any other key for
No): N # 否
  ... skipping.
Reloading the privilege tables will ensure that all changes made so far will take
effect immediately.
# 是否加载特权表
Reload privilege tables now? (Press y|Y for Yes, any other key for No) : Y # 是
Success.
All done!
3) 使用 systemctl status mysql.service 命令检查 MySQL 服务状态,如下图所示:

图 4 MySQL服务状态
可以看出,Active 为 active (running),这说明 MySQL 服务状态是正常的。
4) MySQL 客户端连接服务器。使用客户端工具 MySQL 进入 MySQL 命令提示符下,连接 MySQL。
下面是一个从命令行中连接 MySQL 服务器的简单实例:
ubuntu@ubuntu:~$ sudo mysql -uroot -p
[sudo] password for ubuntu:
Enter password:
Welcome to the MySQL monitor.  Commands end with ; or \g.
Your MySQL connection id is 5
Server version: 5.7.33-0ubuntu0.16.04.1 (Ubuntu)
Copyright (c) 2000, 2021, Oracle and/or its affiliates.
Oracle is a registered trademark of Oracle Corporation and/or its
affiliates. Other names may be trademarks of their respective owners.
Type 'help;' or '\h' for help. Type '\c' to clear the current input statement.
mysql>
登录成功后会出现 MySQL 命令提示窗口,其上可以执行任何 SQL 语句。退出 MySQL 命令提示窗口可以使用 EXIT 命令,具体如下:
mysql> EXIT
Bye
 ICP备案:
 公安联网备案: