首页 > Spring MVC
阅读:3337
Spring MVC文件下载
在实际的项目开发中,文件的上传和下载可以说是最常用的功能之一,例如图片的上传与下载、邮件附件的上传和下载等。在《Spring MVC 文件上传》一节中我们介绍了文件的上传,本节我们将对 Spring MVC 中的文件下载功能进行讲解。
下面我们就结合一个实例,来演示下如何在 Spring MVC 中实现文件的下载功能,可以分为以下步骤。
1. 在《Spring MVC文件上传》一节中创建的 springmvc-file-demo 的工程中,修改 success.html 的代码,在每个图片下面添加一个文件下载的超链接,代码如下。
2. 在net.biancheng.c.controller 包下新建一个名为 DownLoadController 的控制器类,代码如下。
在 DownLoadController 类中共包含以下 2 个方法:
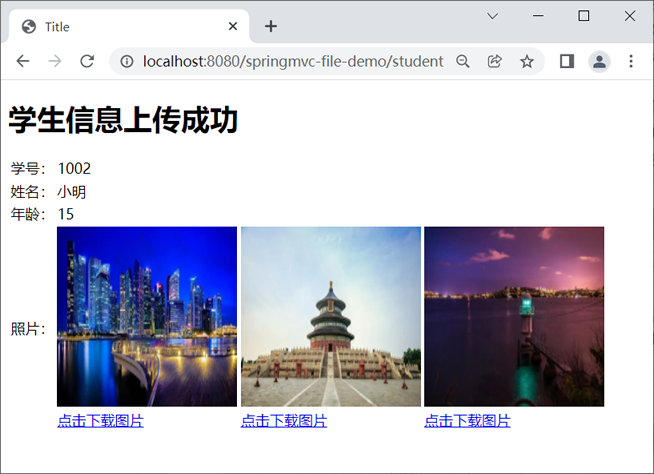
图1:图片上传成功
4. 点击图片下方的“点击下载图片”的超链接,下载对应的图片,结果如下图。
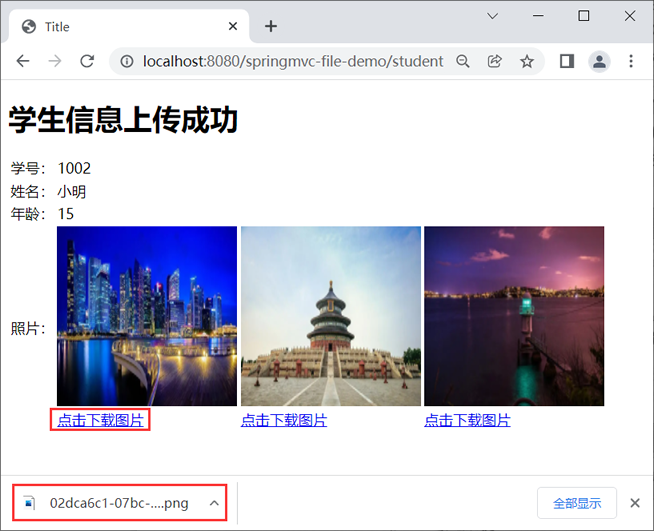
图2:点击链接下载图片
文件下载
文件下载的含义十分简单,它指的就是将服务器中的文件下载到本机上。下面我们就结合一个实例,来演示下如何在 Spring MVC 中实现文件的下载功能,可以分为以下步骤。
1. 在《Spring MVC文件上传》一节中创建的 springmvc-file-demo 的工程中,修改 success.html 的代码,在每个图片下面添加一个文件下载的超链接,代码如下。
<!DOCTYPE html>
<html lang="en" xmlns:th="http://www.thymeleaf.org">
<head>
    <meta charset="UTF-8">
    <title>Title</title>
</head>
<body>
<h1>学生信息上传成功</h1>

<table>
    <tr>
        <td>学号:</td>
        <td th:text="${student.getStuId()}"></td>
    </tr>

    <tr>
        <td>姓名:</td>
        <td th:text="${student.getStuName()}"></td>
    </tr>
    <tr>
        <td>年龄:</td>
        <td th:text="${student.getAge()}"></td>
    </tr>
    <tr>
        <td>照片:</td>
        <td th:each="p:${student.getPath()}">
            <img th:src="${#servletContext.getContextPath()}+'/upload/'+${p}" width='200px' height='200px'/><br>
            <!--图片下载的超链接-->
            <a th:href="@{/downLoadFile(fileName=${p})}">点击下载图片</a>
        </td>
    </tr>
</table>
</body>
</html>
2. 在net.biancheng.c.controller 包下新建一个名为 DownLoadController 的控制器类,代码如下。
package net.biancheng.c.controller;

import org.apache.commons.io.FileUtils;
import org.springframework.http.HttpHeaders;
import org.springframework.http.HttpStatus;
import org.springframework.http.MediaType;
import org.springframework.http.ResponseEntity;
import org.springframework.stereotype.Controller;
import org.springframework.web.bind.annotation.RequestMapping;

import javax.servlet.http.HttpServletRequest;
import java.io.File;
import java.io.IOException;
import java.io.UnsupportedEncodingException;

@Controller
public class DownLoadController {

    /**
     * 文件下载
     *
     * @param request
     * @param fileName
     * @return
     * @throws IOException
     */
    @RequestMapping("/downLoadFile")
    public ResponseEntity<byte[]> downLoadFile(HttpServletRequest request, String fileName) throws IOException {
        //得到图片的实际路径
        String realPath = request.getServletContext().getRealPath("/upload/" + fileName);
        //创建该图片的对象
        File file = new File(realPath);
        //将图片数据读取到字节数组中
        byte[] bytes = FileUtils.readFileToByteArray(file);
        //创建 HttpHeaders 对象设置响应头信息
        HttpHeaders httpHeaders = new HttpHeaders();
        //设置图片下载的方式和文件名称
        httpHeaders.setContentDispositionFormData("attachment", toUTF8String(fileName));
        httpHeaders.setContentType(MediaType.APPLICATION_OCTET_STREAM);
        return new ResponseEntity<>(bytes, httpHeaders, HttpStatus.OK);
    }


    /**
     * 下载保存时中文文件名的字符编码转换方法
     */
    public String toUTF8String(String str) {
        StringBuffer sb = new StringBuffer();
        int len = str.length();
        for (int i = 0; i < len; i++) {
            // 取出字符中的每个字符
            char c = str.charAt(i);
            // Unicode码值为0~255时,不做处理
            if (c >= 0 && c <= 255) {
                sb.append(c);
            } else { // 转换 UTF-8 编码
                byte b[];
                try {
                    b = Character.toString(c).getBytes("UTF-8");
                } catch (UnsupportedEncodingException e) {
                    e.printStackTrace();
                    b = null;
                }
                // 转换为%HH的字符串形式
                for (int j = 0; j < b.length; j++) {
                    int k = b[j];
                    if (k < 0) {
                        k &= 255;
                    }
                    sb.append("%" + Integer.toHexString(k).toUpperCase());
                }
            }
        }
        return sb.toString();
    }
}
在 DownLoadController 类中共包含以下 2 个方法:
- downLoadFile() 方法:负责文件的下载工作,我们首先根据文件路径和文件名称创建一个 File 对象,然后对响应头中文件的打开方式和下载方式进行了设置,并通过 ResponseEntity 对下载结果对象进行封装。
- toUTF8String() 方法:负责完成中文文件名的字符编码转换。
3. 重启 Tomcat 服务服务器,使用浏览器访问“http://localhost:8080/springmvc-file-demo/”,填写学生信息并上传图片,结果如下。ResponseEntity 对象与前面的章节中介绍的 @ResponseBody 注解相似,它也是用来直接返回结果对象的。
图1:图片上传成功
4. 点击图片下方的“点击下载图片”的超链接,下载对应的图片,结果如下图。
图2:点击链接下载图片
 ICP备案:
 公安联网备案: