LSTM长短期记忆模型简介(新手必看)
为了解决梯度消失问题,Hochreiter 和 Schmidhuber 于 1997 年提出了 LSTM(Long Short-Term Memory,长短期记忆模型)
那么,LSTM 如何解决梯度消失问题呢?
无论是梯度消失还是梯度爆炸,都源于网络结构太深,网络权重不稳定,从本质上讲是梯度反向传播中的连乘效应。
做一个相当不严谨但是有助于读者理解的比喻,在现实生活中,如果人流量太大或太小,如何控制呢?砌墙,然后,留几个口,装上门,用门来控制。
LSTM 就引入了门控的概念。LSTM 引入了以下 3 个门:
后来由于 LSTM 比较复杂,Cho 等人于 2014 年提出门控循环单元(Gated Recurrent Unit,GRU)。GRU 简化了 LSTM,将 3 个门简化为:
看了以上理论是不是有点头晕?或是看不懂?没关系!Keras 于 2015 年年初将 LSTM 和 GRU 都封装好了!你不需要关心以上理论细节,只需要简单地将 SimpleRNN(In [3]) 改为 LSTM(In [20]) 即可!其他代码和前面的 RNN 代码相似:
接下来,按照上面的程序,同样对 Microsoft 公司股价数据进行处理并做出预测:
最后,将预测结果可视化:
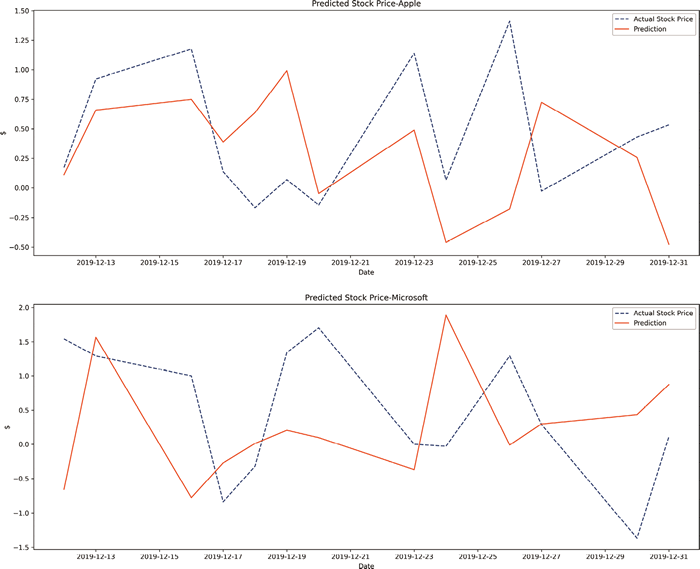
图 1 LSTM 模型预测结果
GRU 的具体实现跟 RNN、LSTM 的类似,只需要简单地将 In [3]的 SimpleRNN 改为 GRU 即可。正因为如此简单,我们就不浪费篇幅罗列全部代码了。
那么,LSTM 如何解决梯度消失问题呢?
无论是梯度消失还是梯度爆炸,都源于网络结构太深,网络权重不稳定,从本质上讲是梯度反向传播中的连乘效应。
做一个相当不严谨但是有助于读者理解的比喻,在现实生活中,如果人流量太大或太小,如何控制呢?砌墙,然后,留几个口,装上门,用门来控制。
LSTM 就引入了门控的概念。LSTM 引入了以下 3 个门:
- 遗忘门(Forget Gate);
- 输入门(Input Gate);
- 输出门(Output Gate)。
后来由于 LSTM 比较复杂,Cho 等人于 2014 年提出门控循环单元(Gated Recurrent Unit,GRU)。GRU 简化了 LSTM,将 3 个门简化为:
- 重置门(Reset Gate);
- 更新门(Update Gate)。
看了以上理论是不是有点头晕?或是看不懂?没关系!Keras 于 2015 年年初将 LSTM 和 GRU 都封装好了!你不需要关心以上理论细节,只需要简单地将 SimpleRNN(In [3]) 改为 LSTM(In [20]) 即可!其他代码和前面的 RNN 代码相似:
In [18]: from tensorflow.keras.layers import LSTM

In [19]: n_steps = 13 ❶
         n_features = 1 ❷

In [20]: model = Sequential()
         model.add(LSTM(512, activation='relu',
                   input_shape=(n_steps, n_features),
                   return_sequences=True)) ❸
         model.add(Dropout(0.2)) ❹
         model.add(LSTM(256,activation='relu')) ❺
         model.add(Flatten()) ❻
         model.add(Dense(1, activation='linear')) ❼

In [21]: model.compile(optimizer='rmsprop', loss='mean_squared_error',
                       metrics=['mse']) ❽

In [22]: history = model.fit(X_aapl, y_aapl,
                             epochs=400, batch_size=150, verbose=0,
                             validation_split = 0.10) ❾

In [23]: start = X_aapl[X_aapl.shape[0] - 13]
         x_input = start
         x_input = x_input.reshape((1, n_steps, n_features))

In [24]: tempList_aapl = []
         for i in range(len(diff_test_aapl)):
             x_input = x_input.reshape((1, n_steps, n_features))
             yhat = model.predict(x_input, verbose=0)
             x_input = np.append(x_input, yhat)
             x_input = x_input[1:]
             tempList_aapl.append(yhat)
- ❶ 定义时间步骤。
- ❷ 定义特征数。
- ❸ 构建 LSTM。
- ❹ 添加 dropout 层以防止过拟合。
- ❺ 添加一个具有 256 个神经元、使用 ReLU 激活函数的隐藏层。
- ❻ 将模型展平以将三维矩阵转换为向量。
- ❼ 添加一个输出层,激活函数设置为 linear。
- ❽ 使用均方根传播(rmsprop)和均方误差(mse)编译 LSTM。
- ❾ 用 LSTM 模型拟合 Apple 公司股价数据。
接下来,按照上面的程序,同样对 Microsoft 公司股价数据进行处理并做出预测:
In [25]: history = model.fit(X_msft, y_msft,
                             epochs=400, batch_size=150, verbose=0,
                             validation_split = 0.10)

In [26]: start = X_msft[X_msft.shape[0] - 13]
         x_input = start
         x_input = x_input.reshape((1, n_steps, n_features))

In [27]: tempList_msft = []
         for i in range(len(diff_test_msft)):
             x_input = x_input.reshape((1, n_steps, n_features))
             yhat = model.predict(x_input, verbose=0)
             x_input = np.append(x_input, yhat)
             x_input = x_input[1:]
             tempList_msft.append(yhat)
最后,将预测结果可视化:
In [28]: fig, ax = plt.subplots(2, 1, figsize=(18, 15))
         ax[0].plot(diff_test_aapl, label='Actual Stock Price', linestyle='--')
         ax[0].plot(diff_test_aapl.index, np.array(tempList_aapl).flatten(),
                    linestyle='solid', label="Prediction")
         ax[0].set_title('Predicted Stock Price-Apple')
         ax[0].legend(loc='best')
         ax[1].plot(diff_test_msft, label='Actual Stock Price', linestyle='--')
         ax[1].plot(diff_test_msft.index, np.array(tempList_msft).flatten(),
                    linestyle='solid', label="Prediction")
         ax[1].set_title('Predicted Stock Price-Microsoft')
         ax[1].legend(loc='best')

         for ax in ax.flat:
             ax.set(xlabel='Date', ylabel='$')
         plt.show()
得出下图所示的图表:图 1 LSTM 模型预测结果
GRU 的具体实现跟 RNN、LSTM 的类似,只需要简单地将 In [3]的 SimpleRNN 改为 GRU 即可。正因为如此简单,我们就不浪费篇幅罗列全部代码了。
 ICP备案:
 公安联网备案: