Qt QHBoxLayout水平布局用法详解
QHBoxLayout 是 Qt 提供的一种水平布局工具(水平布局控件),可以容纳多个控件,并将这些控件水平依次摆放,如下图所示。
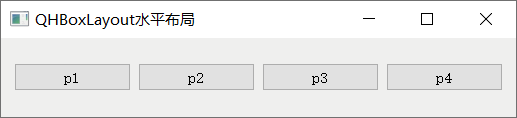
图 1 QHBoxLayout水平布局
图 1 演示的是 QHBoxLayout 水平摆放 4 个 QPushButton 按钮的效果。实际场景中,QHBoxLayout 中还可以放置其它控件,比如 QLabel 文本框、QLineEdit 单行输入框等。
借助 QHBoxLayout 布局控件,我们可以快速地调整各个控件之间的间距、对齐方式等。更重要的是,当用户改变窗口的尺寸时,QHBoxLayout 内部各个控件的尺寸会随之做出相应地调整。
使用 QHBoxLayout 水平布局控件,程序中要提前引入
QHBoxLayout 类的继承关系是
举个简单的例子:

图 2 QHBoxLayout水平布局实例
图 1 QHBoxLayout水平布局
图 1 演示的是 QHBoxLayout 水平摆放 4 个 QPushButton 按钮的效果。实际场景中,QHBoxLayout 中还可以放置其它控件,比如 QLabel 文本框、QLineEdit 单行输入框等。
借助 QHBoxLayout 布局控件,我们可以快速地调整各个控件之间的间距、对齐方式等。更重要的是,当用户改变窗口的尺寸时,QHBoxLayout 内部各个控件的尺寸会随之做出相应地调整。
使用 QHBoxLayout 水平布局控件,程序中要提前引入
<QHBoxLayout>头文件。QHBoxLayout 类提供有两个构造函数:QHBoxLayout() QHBoxLayout(QWidget *parent)创建 QHBoxLayout 对象时,可以指定父窗口,那么它将作为父窗口中布局其它控件的工具;也可以暂时不指定父窗口,待全部设置完毕后再将其添加到某个窗口中。
QHBoxLayout 类的继承关系是
QHBoxLayout->QBoxLayout->QLayout,该类并没有新增任何成员方法,它只能使用从父类继承的成员方法,下表给大家罗列了常用的一些:| 成员方法 | 功 能 |
|---|---|
| void QBoxLayout::addWidget(QWidget *widget, int stretch = 0, Qt::Alignment alignment = Qt::Alignment()) |
向布局控件中添加指定的 widget 控件。 默认情况下,新加入控件的 stretch 拉伸系数为 0,表示该控件不会过多占用布局控件的空间;alignment 是一个枚举类型参数,默认的枚举值也是 0,表示该控件会填满占用的整个空间。 |
| void QBoxLayout::addStretch(int stretch = 0) |
添加一个空白列,整个窗口中除了控件占用的区域外,其它区域可以由多个(≥0)空白列分摊,分摊比例取余于各个空白列设置的 stretch 的值(又称伸缩系数)。 strech 参数的默认值为 0,表示当窗口很小时,空白列可以不占据窗口空间。当窗口中包含多个 strech 值为 0 的空白列时,它们会平分窗口中的空白区域。 |
| void QBoxLayout::addSpacing(int size) | 添加一个 size 大小的固定间距。 |
| void QLayout::setMargin(int margin) | 设置布局控件中所有控件的外边距,上、下、左、右外边距的大小都为 margin。默认情况下,所有方向的外边距为 11 px。 |
| void QLayout::setContentsMargins(int left, int top, int right, int bottom) | 设置布局控件中所有控件的外边距,可以自定义上、下、左、右外边距的值。 |
| void QBoxLayout::setDirection(Direction direction) | 设置布局控件中控件的布局方向,Direction 是一个枚举类型,对于 QVBoxLayout 布局控件,direction 参数的值通常选择 QBoxLayout::TopToBottom(从上到下依次摆放)或者 QBoxLayout::BottomToTop(从下到上依次摆放)。 |
| bool QBoxLayout::setStretchFactor(QWidget *widget, int stretch) | 设置布局控件中某个控件的拉伸系数。 |
| bool QBoxLayout::setStretchFactor(QLayout *layout, int stretch) | 布局控件内部还可以再放置一个布局控件,并设置它的拉伸系数。 |
举个简单的例子:
#include <QApplication>
#include <QWidget>
#include <QLabel>
#include <QHBoxLayout>

int main(int argc, char *argv[])
{
    QApplication a(argc, argv);
    //创建主窗口
    QWidget widget;
    widget.setWindowTitle("QHBoxLayout水平布局");
    //创建水平布局控件
    QHBoxLayout *layout=new QHBoxLayout;
    //设置布局控件中所有控件的布局方向为从右往左依次排列
    layout->setDirection(QBoxLayout::RightToLeft);

    //连续创建 3 个文本框,并设置它们的背景和字体大小
    QLabel lab1("Label1");
    lab1.setStyleSheet("QLabel{background:#dddddd;font:20px;}");
    lab1.setAlignment(Qt::AlignCenter);
    QLabel lab2("Label2");
    lab2.setStyleSheet("QLabel{background:#cccccc;font:20px;}");
    lab2.setAlignment(Qt::AlignCenter);
    QLabel lab3("Label3");
    lab3.setStyleSheet("QLabel{background:#ffffff;font:20px;}");
    lab3.setAlignment(Qt::AlignCenter);

    //将 3 个文本框和 2 个空白列添加到管理器中,它们的拉伸系数比是 2:1:2:3:3
    layout->addStretch(2);
    layout->addWidget(&lab1,1);
    layout->addWidget(&lab2,2);
    layout->addWidget(&lab3,3);
    layout->addStretch(3);

    //将布局控件添加到 widget 窗口中
    widget.setLayout(layout);
    widget.show();
    return a.exec();
}
程序执行结果为:
图 2 QHBoxLayout水平布局实例